What is Paracord?
Paracord (parachute cord) is a lightweight nylon rope originally used in the suspension lines of US parachutes during World War II. Once in the field, paratroopers found this cord useful for many other tasks. This versatile cord is now used as a general purpose utility cord by both military personnel and civilians.
The braided sheath comes in a variety of colors and its 7 inner strands provide a multitude of uses. Typical uses include attaching equipment to harnesses, as strapping to avoid losing small or important items, tying items to vehicle racks, securing nets to trees or vehicles, tourniquets, etc.

The inner strands of the core can also be removed when finer string is needed. Uses include sewing thread to repair gear, fishing line, tripwire, nets, traps, and other emergency and/or survival situations.
The nylon sheath is often used alone (the strands in the core removed) when a thinner or less elastic cord is needed, such as when used as a boot lace. The ends of the cord can easily be melted to prevent fraying.
Paracord Bracelets
In addition to purely utility uses, paracord can be used to fashion knotted or braided bracelets, lanyards, keychains, belts, and other decorative items.Paracord survival bracelets are worn around the world. They are a great way to carry around a fair amount of paracord with you in case of any emergency situation. Although the paracord bracelet is made to hold securely on your wrist while you are wearing it, it can be unraveled and the paracord can help you in a number of the afore-mentioned scenarios.
Even if not used for emergency/survival purposes, paracord bracelets are not simply a fashion statement--
Paracord bracelets are a symbol of supporting our military
and first responders!
What You Will Need to Make a Paracord Survival Bracelet:
- 550 lb. Paracord
- 3/8" curved plastic side-release buckle
- scissors
- lighter
- apparatus to hold bracelet in place while weaving (see separate post for instructions)
The amount of paracord used can vary, but we will use 8 ft in this tutorial. Typically, the amount of paracord used for the bracelet is about 1 foot for every 1 inch of knotted bracelet length.
 |
| Supplies needed |
 |
| 3/8" curved plastic buckle |
Step One: Measure Paracord
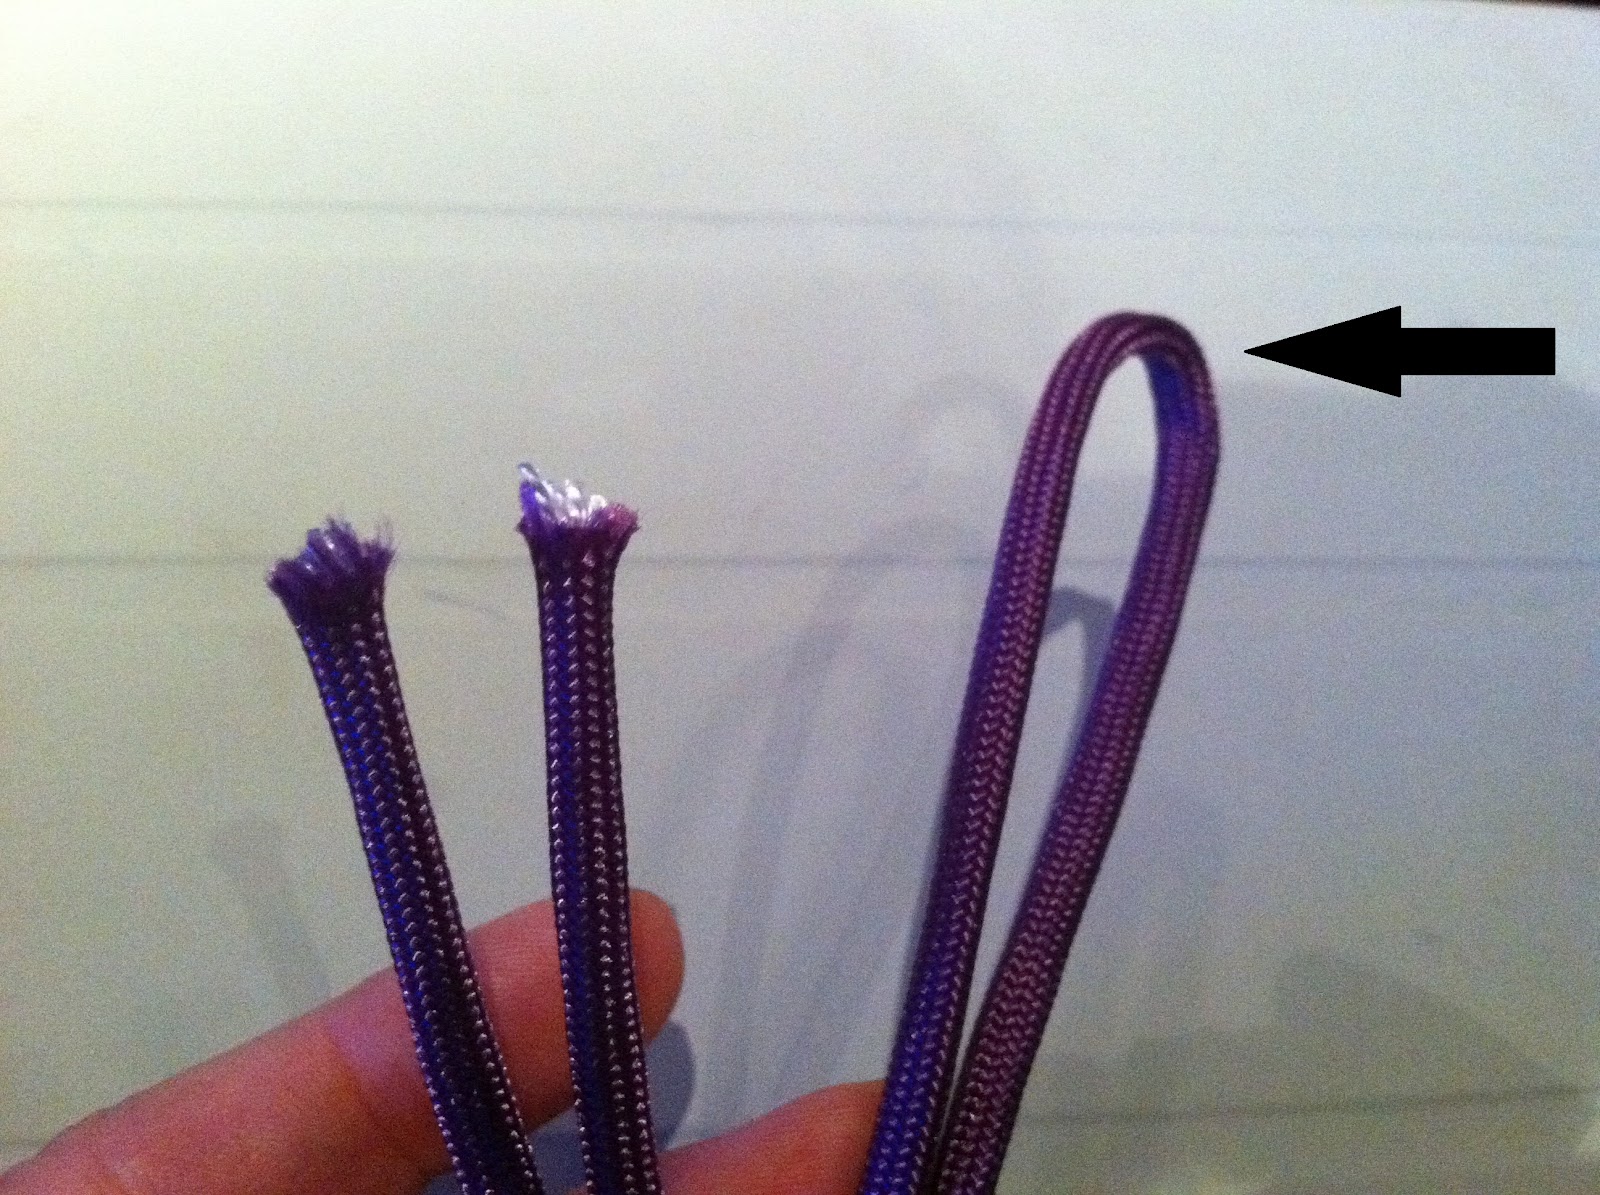
Measure and cut an 8 ft piece of paracord.
Match up two ends and find the center of the piece:
Step Two: Thread Through the Buckle
Look at the top of the plastic buckle and find the seam where the two pieces (male and female) connect. This seam should be on the right side of the buckle:

Insert the apex of the loop from the top of the right side of the buckle, down through the opening:

Continue threading the apex of the loop over the top of the left side of the buckle and down through the opening:

Now, open the buckle:

Pull the loop over the top of the female part of the buckle...

...and pull it taut:

Determine the size of the bracelet by attaching it loosely around your wrist. (You might want to add another inch to your measured wrist length just for wiggle room and comfortability.) Unbuckle the bracelet and carefully retain the distance between to two buckles.
Attach the female part of buckle at bottom of your weaving apparatus (the buckles on the apparatus may be adjusted to fit your wrist measurement).

Click the male part of the buckle at the top of the weaving apparatus. When both parts of the buckle are connected to the apparatus, pull on the free ends to prepare for weaving:

Step Three: Weave
Tie a simple knot underneath the vertical cords of the bracelet:
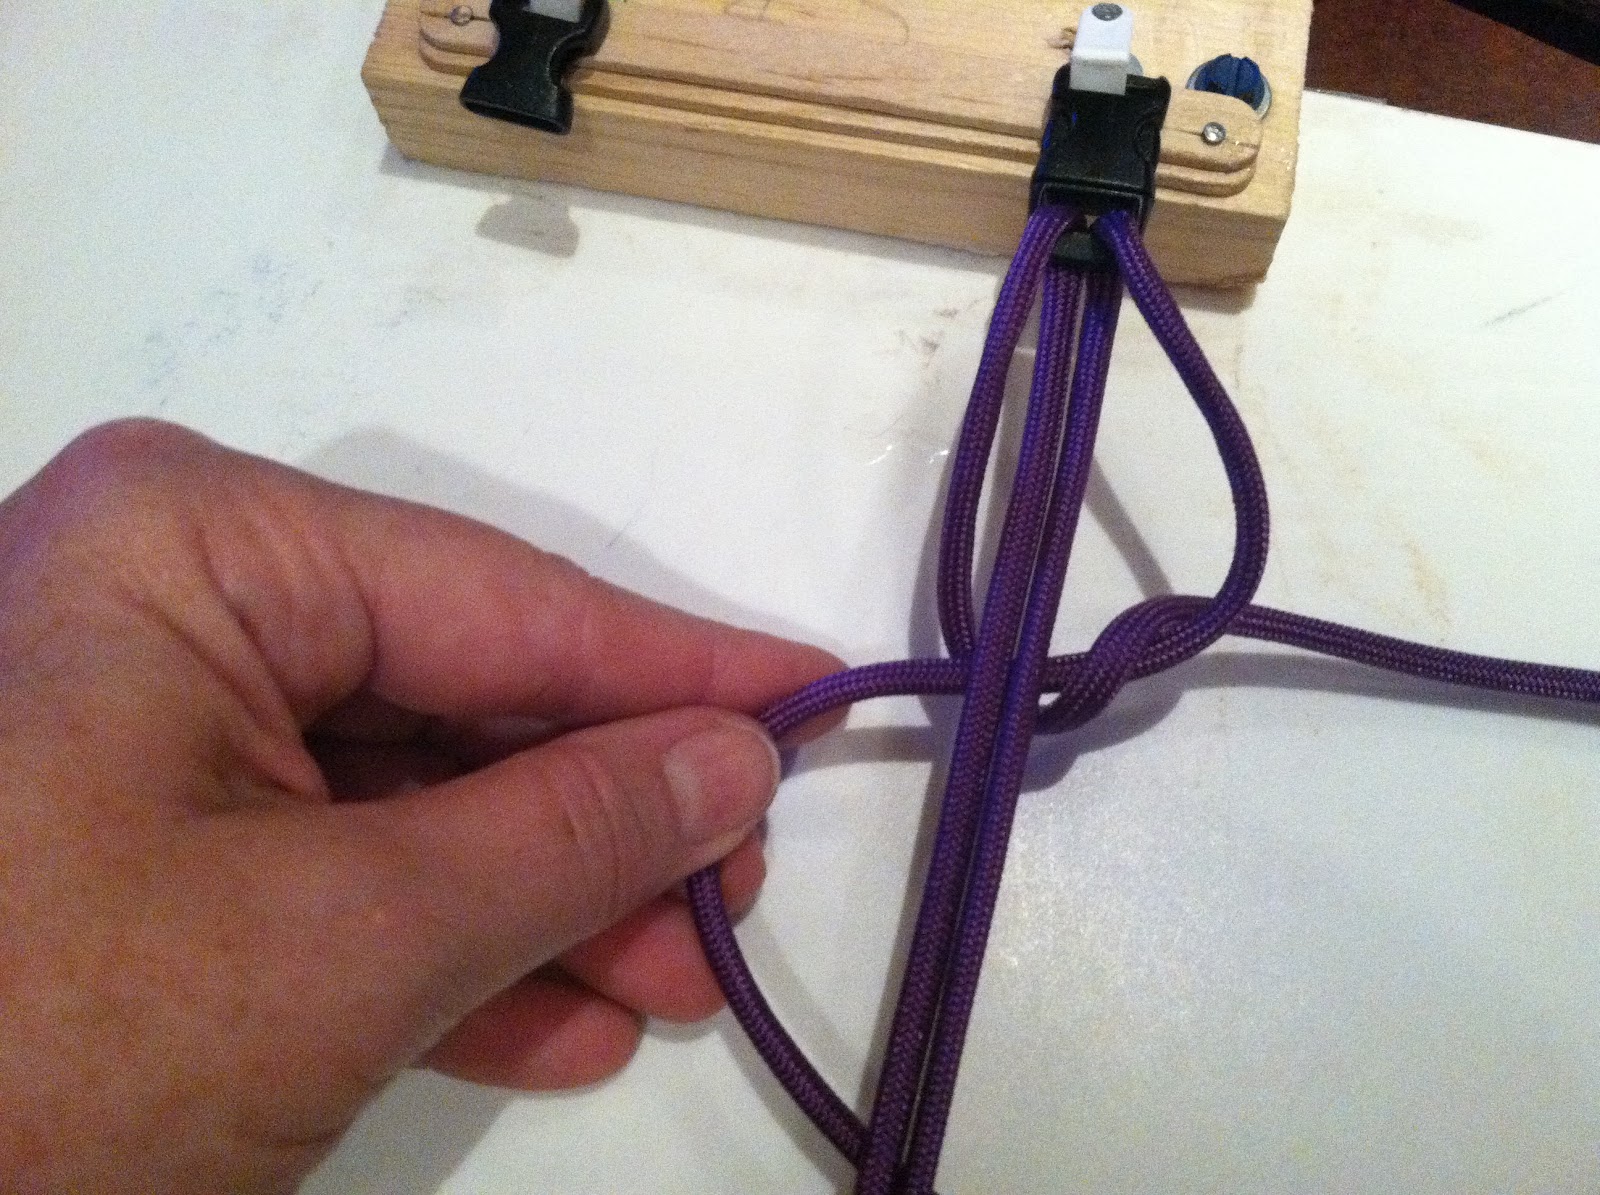
Pull the free ends of the cord out to the side to tighten:

Notice that the cord on the right points down and the cord on the left points up. These positions will alternate with each weave. Always begin your weave with the cord that is pointing down:
.jpg) |
| A closer look |
Cross the right cord over the vertical cords to the left side:

Take the top left cord and pull it down over the bottom cord...

...then under the vertical cords, and pull through the loop on the right:

Looks like an upside down pretzel!
Pull the free ends out to the side to tighten:
.jpg)
Now, notice the cord on the left is pointing down and the cord on the right is pointing up. Start your next weave by crossing the left cord over the vertical cords to the right side:

Take the top right cord and pull it down over the bottom cord...

...then under the vertical cords, and pull up through the loop on the left:

Pull the free ends out to the side to tighten:

Repeat each weave...

...until you get all the way to the bottom:

Note: If you don't alternate the weaves, the pattern will not look consistent.
Simply undo the last knot and alternate it to correct.
Detach bracelet from the apparatus and turn it over with female part of buckle at top:

Tuck in end of cord to underside of bracelet:

Step Four: Cut and Gut
Trim ends of cord to approximately 1/2":

Press ends to open up and expose inner white strands:

Remove as much of the white strands as possible (gut). The outer shell of the paracord will melt together easier without the inner strands.

Step Five: Burn and Turn
Burn the gutted ends with the lighter:

When the ends begin to melt...

...quickly turn it over and press the melted ends against the side of the lighter to seal the ends together:

You must be careful with this step! The melted paracord is extremely hot, and it's possible to get burned.
After a few seconds, the melted paracord will harden. Turn the lighter (twist it) to release the bracelet from the lighter.
The underneath part of the bracelet should look something like this:
 |
| It ain't pretty, but who's gonna see it, eh? |
Here's a closer look:

And here's the finished bracelet:
 |
| Voila! |
It takes a little practice, but once you get the hang of it, you'll be a pro!
 |
| This guy is so happy he made a paracord bracelet, he's doing a happy dance! |
If you would like to make and donate paracord bracelets for a good cause:
SHIP TO:
Operation Gratitude/California Army National Guard
17330 Victory Boulevard
Van Nuys, CA 91406
Attn: Rich Hernandez


About Operation Gratitude
Operation Gratitude annually sends 100,000+ care packages filled with snacks, entertainment items and personal letters of appreciation addressed to individually named U.S. Service Members deployed in harm's way, to their children left behind, to military families and veterans in financial distress due to unemployment, and to Wounded Warriors recuperating in transition units. The organization's mission is to lift morale, bring a smile to a service member's face and express to our Armed Forces the appreciation and support of the American people. Each package contains donated product valued at ~$125 and costs the organization $15 to assemble and ship. For safety and security, assembling of packages occurs at the Army National Guard armory in Van Nuys, California. Since its inception in 2003, Operation Gratitude volunteers have shipped more than 760,000 packages to American Military members and their children.
Learn more about Operation Gratitude by visiting:
Learn more about Operation Gratitude by visiting:
Twitter: http://twitter.com/OpGratitude
Facebook: http://facebook.com/OperationGratitude
Blog: http://OpGrat.wordpress.com
YouTube: http://youtube.com/OpGrat
Pinterest: http://pinterest.com/opgratitude
Facebook: http://facebook.com/OperationGratitude
Blog: http://OpGrat.wordpress.com
YouTube: http://youtube.com/OpGrat
Pinterest: http://pinterest.com/opgratitude
About Team Rubicon
Team Rubicon unites the skills and experiences of military veterans with medical professionals to rapidly deploy emergency response teams into crisis situations. TR is creating a new paradigm in disaster response that recognizes and harnesses the skills of military veterans; offering them a chance to continue their service by helping and empowering those afflicted by disasters, and also themselves.
Twitter: http://twitter.com/teamrubicon
Facebook: http://facebook.com/teamrubicon
Vimeo: http://vimeo.com/teamrubicon
Flicker: http://flickr.com/teamrubicon
Facebook: http://facebook.com/teamrubicon
Vimeo: http://vimeo.com/teamrubicon
Flicker: http://flickr.com/teamrubicon
YouTube: http://youtube.com/teamrubiconusa
THANK YOU FOR YOUR SUPPORT
Please post any comments below. If anything is unclear, we will try to help!
Be sure to see our other post about making your own weaving apparatus.
Wow! This tutorial is so well written and the illustrations are really clear. I just know I could make one of these from these directions!
ReplyDeleteNow, to find where to get supplies and how to set up a handy-dandy contraption that is at least as functional as the one in the pictures. That is a neat contraption! Someone should make those and sell them!
~ Jean O,
A Chronic Volunteer
Thank you, Jean. I have added a new post with instructions for a "handy-dandy contraption." Suzan
DeleteWhere can I fid the instructions for the contraption made out of WOOD that holds the clips while you make the bracelet?
DeleteThank you.
My husband made it. It's just a pine board with a small piece of wood attached at top and bottom. I added the buckles and it works well on a tabletop or in your lap.
DeleteThis is really informative and I will for sure refer my friends the same. I have been looking the World Wide Web for this information and I want to thank you for this post.Thanks.
ReplyDeleteRegards,
Rothco
Thank you for your comment, Rothco. :)
DeleteDoes anyone know where to get the 3/8" curved buckles? I am having a hard time locating them. Thanks!
ReplyDeletejnicolosi2@gmail.com
Hi, and thanks for visiting.
DeleteYou can find buckles on eBay.
Just search for: plastic buckles 3/8
Thank you for your blog and instructions on how to make these great paracord survival bracelets. Great instructions.
ReplyDeleteThank you for taking the time to comment. Making these bracelets soon becomes an addiction!
DeleteThanks so much for sharing this. I've been looking paracord survival bracelets information and this site has helped.
ReplyDeleteNice tutorial! I gave it a thumb up.Paracord
ReplyDeleteLove making these. How long should the bracelets be? Mine are turning out to be 10 1/2 inches once they're buckled...seems big.
ReplyDeleteThanks for your interest, Sohello. My measurements are as follows:
Delete7" - small
8" - medium
9" - large
Nice tut! I also like to make paracord bracelets. My favorite so far is the thin line bracelet design.
ReplyDeleteMark
This comment has been removed by a blog administrator.
ReplyDeleteThanks
ReplyDeleteThe Paracord has helped me in so many situations. I admire making Paracord bracelets, because they consume a sizeable length of cord, which can come in handy during camping and hiking. I like your tutorial; it’s simple to understand and follow. I also find the following post to be quite informative: http://survival-mastery.com/skills/scouting/making-a-parachute-cord-bracelet.html
ReplyDeleteThanks
ReplyDeleteI have made a number of survival Paracord bracelets, and believe you me; success depends mostly on one’s braiding skills. The process presented on your post is fairly simple to follow, and you have even simplified the braiding with the step-by-step images. Guys learn more here: http://survival-mastery.com/diy/useful-tools/paracord-braiding.html
ReplyDelete